Raspberry Pi Pico USB compass, pitch and heel sensor

I could not resist to buy a Raspberry Pi Pico when I visited my local electronic supplier. It costed less than 10 €, but at that time I did not really know what to do with it. I tested the analog input and it seemed too noisy for battery condition measurements. Another project involved a electronic compass together with a radar, and there was problems with the calibration. I thought I could build a simulator for that but then I found the I2C magnetometer- accelometer which I had used for other purposes. Pin connections: LM303D RPi Pico Vin . Pin 36 GND Pin 38 SDA Pin 1 (I2C0) SCL Pin 2 (I2C0) With the help of some I2C tutorials for RPi Pico I found out how to access the registers and the math I had already working in RPi 3 and RPi Zero. The tricky part for me was to handle byte data and Hex formatting. After solving that I was ready to test the system in OpenCPN, which runs on a RPI 4. After adding the necessary instrument (Settings-Plugins-Dashboard) and adding the serial USB port (/dev//ttyACM0) and adjusted Baudrate (115200) it started immediately to show the numeric value of True heading. It seems that OpenCPN corrects the deviation automatically.
The break-out board should be placed text upwards and the X arrow pointing towards the nose.

The dashboard shows now the GPS .position GPS compass, True Magnetic Heading, Pitch and Heel.
The NMEA0183 sentence uses the keywoard "ROLL", but OpenCPN dispays the title "Heel".
The RPi Pico also has a 3.3 V logic level serial port, which can be configured to desired baudrate and amplified to RS232 levels, if the system is used with plotters that have serial NMEA0183 inputs.
## Erik Nordenswan, Finland, (the country that won Russia in icehockey in the Olympic Games Final 20.2.2022)
## 22.2.2022
## Micropython script for Pololu break-out board with LM303 Accelerometer and Compass
## Compass is tilt-compensated
## Copy this script to Raspberry Pi Pico with the name main.py
## RPi Pico starts sending every second a NMEA0183 sentence with the magnetic heading with 115200 baud
## The receiving USB port on a Raspberry Pi will be ttyACM0
## The on-board LED blinks when the script is running
## You can stop the script with Thonny editor (first start Thonny, then power-on, then Thonny stop icon)
## Thanks to several programmers, who have published their code for LM303 on the Internet


import machine
sdaPIN = machine.Pin(0)
sclPIN = machine.Pin(1)
i2c=machine.I2C(0,sda=sdaPIN, scl=sclPIN, freq = 400000)
from utime import sleep
import math
from machine import Pin

led = Pin(25, Pin.OUT)
devices = i2c.scan()


def twocc(h,l):  #two:s complement combine
    twocc = 256*h + l
    if twocc >= 32768:
        return twocc - 65536
    else:
        return twocc


i2c.writeto_mem(0x1D,0x20,b'\x57')
i2c.writeto_mem(0x1D,0x21,b'\x00')
i2c.writeto_mem(0x1D,0x24,b'\x64')
i2c.writeto_mem(0x1D,0x25,b'\x20')
i2c.writeto_mem(0x1D,0x26,b'\x00')
sleep(1)

while 1:
    mxl = i2c.readfrom_mem(0x1D,0x08,1)
    mxh = i2c.readfrom_mem(0x1D,0x09,1)
    myl = i2c.readfrom_mem(0x1D,0x0A,1)
    myh = i2c.readfrom_mem(0x1D,0x0B,1)
    mzl = i2c.readfrom_mem(0x1D,0x0C,1)
    mzh = i2c.readfrom_mem(0x1D,0x0D,1)
    axl = i2c.readfrom_mem(0x1D,0x28,1)
    axh = i2c.readfrom_mem(0x1D,0x29,1)
    ayl = i2c.readfrom_mem(0x1D,0x2A,1)
    ayh = i2c.readfrom_mem(0x1D,0x2B,1)
    azl = i2c.readfrom_mem(0x1D,0x2C,1)
    azh = i2c.readfrom_mem(0x1D,0x2D,1)

    mxli = int(mxl[0])
    mxhi = int(mxh[0])
    myli = int(myl[0])
    myhi = int(myh[0])
    mzli = int(mzl[0])
    mzhi = int(mzh[0])
    axli = int(axl[0])
    axhi = int(axh[0])
    ayli = int(ayl[0])
    ayhi = int(ayh[0])
    azli = int(azl[0])
    azhi = int(azh[0])

    mx = twocc(mxhi, mxli)
    my = twocc(myhi, myli)
    mz = twocc(mzhi, mzli)

    ax = twocc(axhi, axli)
    ay = twocc(ayhi, ayli)
    az = twocc(azhi, azli)

    pitch = (math.atan2(ax,math.sqrt(ay*ay+az*az)))
    roll = -(math.atan2(ay,math.sqrt(ax*ax+az*az)))

    if az > 0 and ax > 0:
        pitch = math.pi - pitch
    if az > 0 and ax < 0:
        pitch = - math.pi - pitch
    if az > 0 and ay > 0:
       roll =  math.pi - roll
    if az > 0 and ay < 0:
       roll = - math.pi - roll

    Xc = mx * math.cos(pitch) + mz * math.sin(pitch)
    Yc = mx * math.sin(roll) * math.sin(pitch) + my * math.cos(roll) - mz * math.sin(roll) * math.cos(pitch)

    Compass = (math.atan2(Yc, -1*Xc))*57.296 +180


    a = "HCHDM," + '{:05.1f}'.format(Compass) + ",M"
    chksum = 0
    le = len(a)
    for j in range (0, le):
        b = ord(a[j:j+1])
        #c = a[j:j+1]
        chksum = chksum^b

    c = '{0:02X}'.format(chksum)
    a = "$" + a[0:le] + "*" + c
    led.toggle()
    print (a, end = "\r\n")

    a = "IIXDR,A," + '{:05.1f}'.format(pitch*57.296) + ",D,PITCH"
    chksum = 0
    le = len(a)
    for j in range (0, le):
        b = ord(a[j:j+1])
        #c = a[j:j+1]
        chksum = chksum^b

    c = '{0:02X}'.format(chksum)
    a = "$" + a[0:le] + "*" + c
    led.toggle()
    print (a, end = "\r\n")

    a = "IIXDR,A," + '{:05.1f}'.format(roll*57.296) + ",D,ROLL"
    chksum = 0
    le = len(a)
    for j in range (0, le):
        b = ord(a[j:j+1])
        #c = a[j:j+1]
        chksum = chksum^b

    c = '{0:02X}'.format(chksum)
    a = "$" + a[0:le] + "*" + c
    led.toggle()
    print (a, end = "\r\n")

    sleep(1)
Boat Measurements with Raspberry Pi
Author: Erik Nordenswan, a retired engineer. (This email address is being protected from spambots. You need JavaScript enabled to view it.)
Date: 4.1.2022
Monitoring liquid levels in a boat can be done with low cost using Raspberry Pi and some low-cost components. The system I have built can also monitor battery voltages, temperatures and air moisture. The system can send the data to a Internet server and displayed with Node-Red.
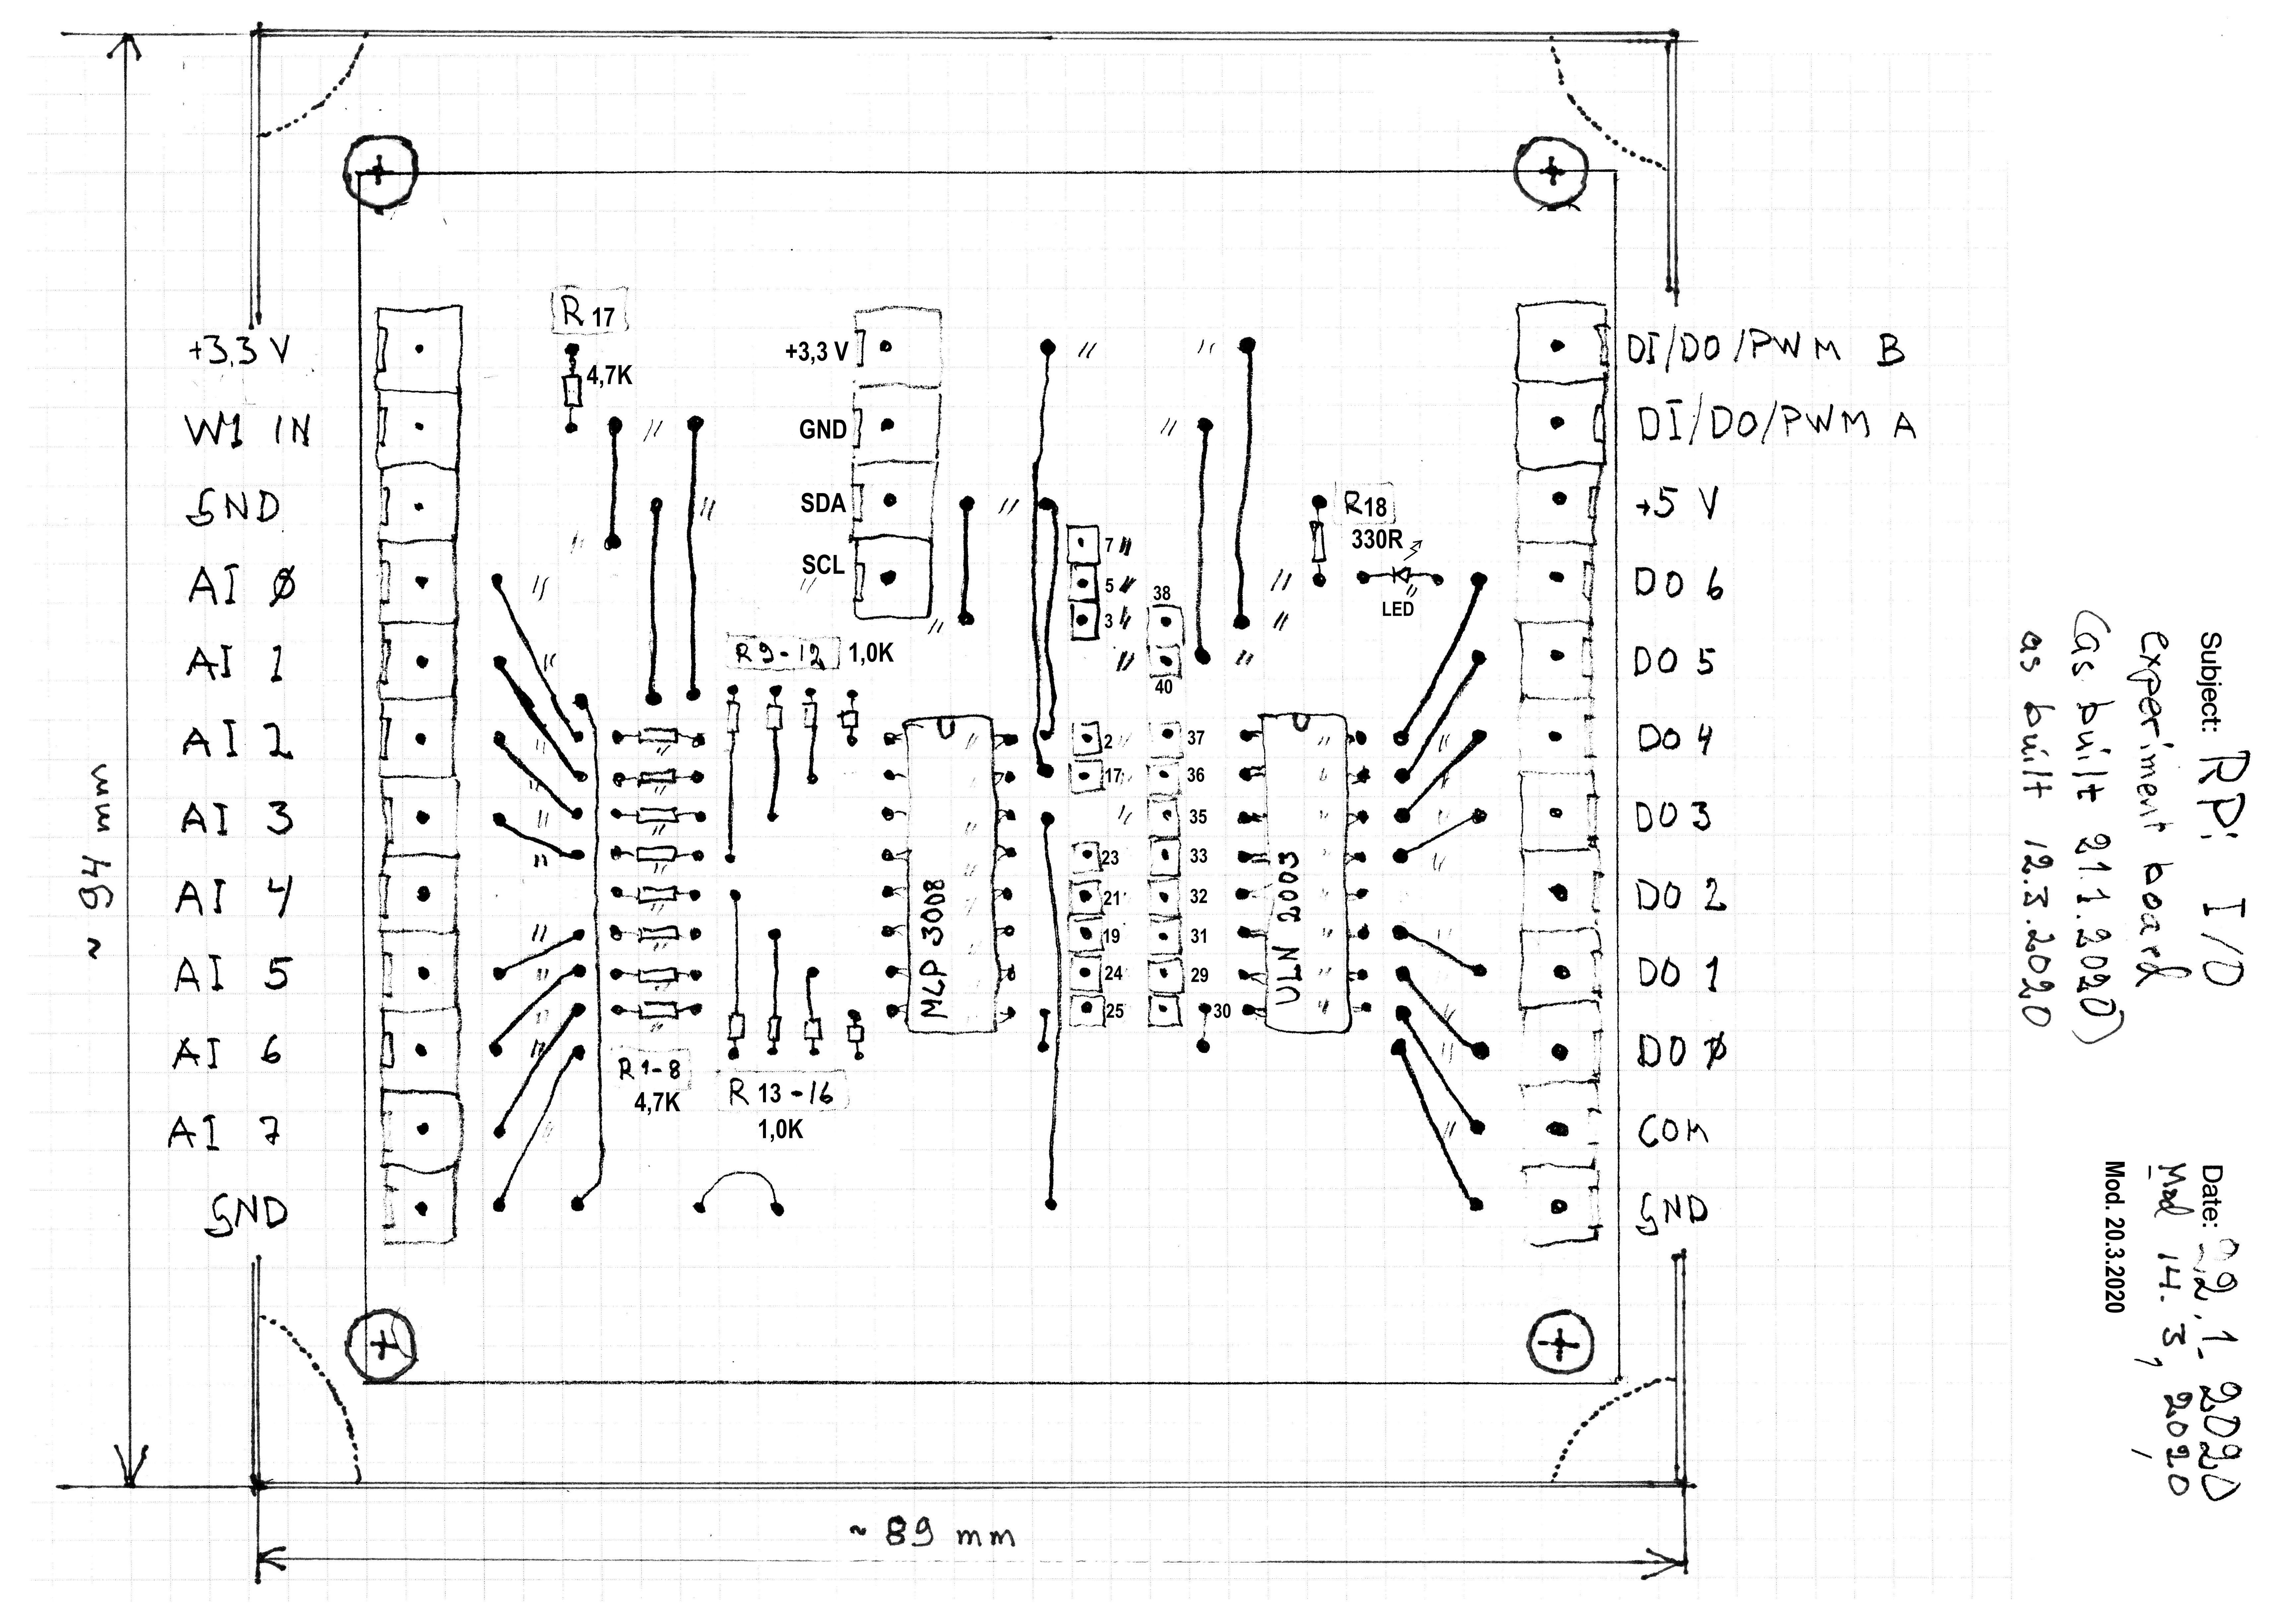
The measurement card is designed to be used in several projects and it has eight analog inputs (0 - 18 V DC), buffered digital outputs for driving valves, relays and small electric motors. It also has connections for the one-wire (W1), I2C and SPI buses. The attached drawings are from 2020 and some improvements have been made to the design. A 12V- feeded LM705 regulator has been added to drive the MPX5010DP sensor as well as the valves and the pump. For a 12V air pump (Pollin) a LM7808 has been installed.
The measurement veroboard läyout

Schematics of the multi-purpose measurement card

Pump and valve unit with transistor drives. Later the ULN2003 chip was implemented. The pump is from a cheap (15 €) blood-pressure meter. Pressure sensor MPX5010DP is fixed on a small vero-board.

A simple LCD-display is based on a voltmeter display and PWM-signal from RPi. A one-button selector starts measurement and the volume is displayed in liters. The switch is for a 9 V battery.

This new vesion has not the ULN2003 chip because it will be used with the older pump units.
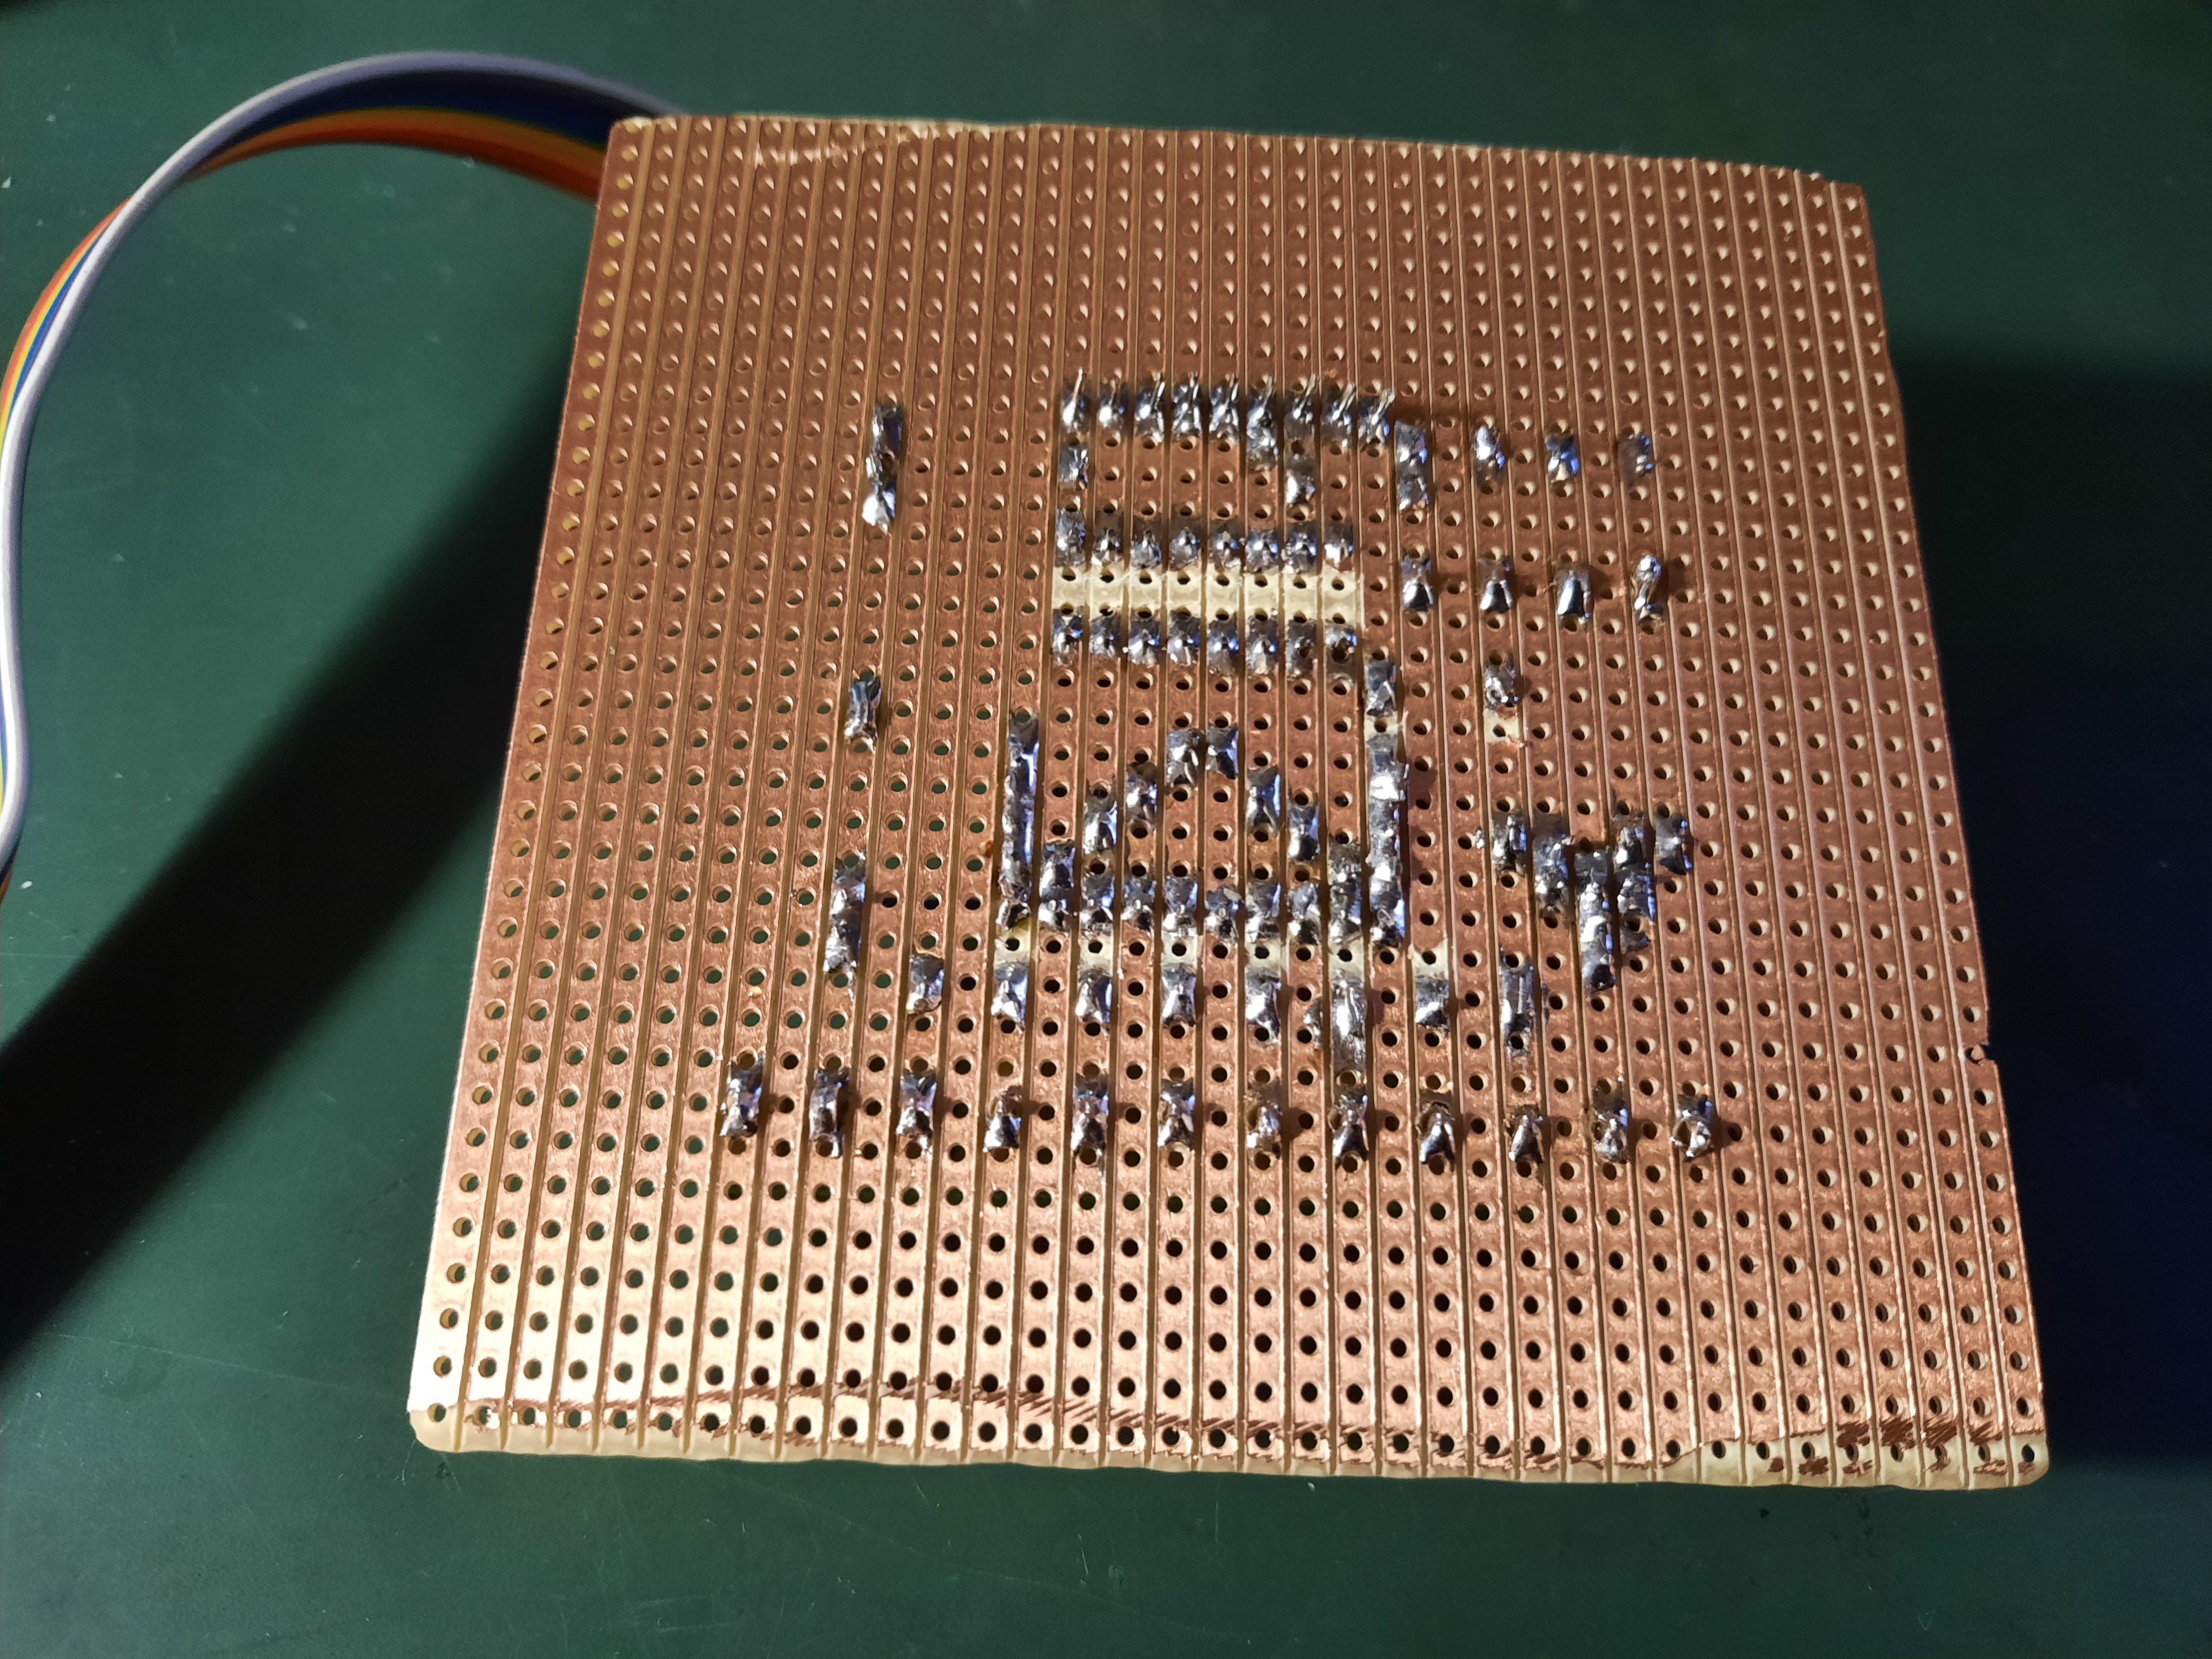
The back side of the vero board shows the conducting stripes, which are used to connect the electronic components.

The advantage of the pressure method is that the air tube can be attached from the top of the tank, and there is no risk of leakage from the fuel or holding tank. An air-tihgt connection can be done with a grommet that is often used with electric cables. A plastic pneumatic tube of 6 mm outer and 4 mm inner diameter is stiff enough to stand right in the tank without extra support. It is also easy to install it in the boat
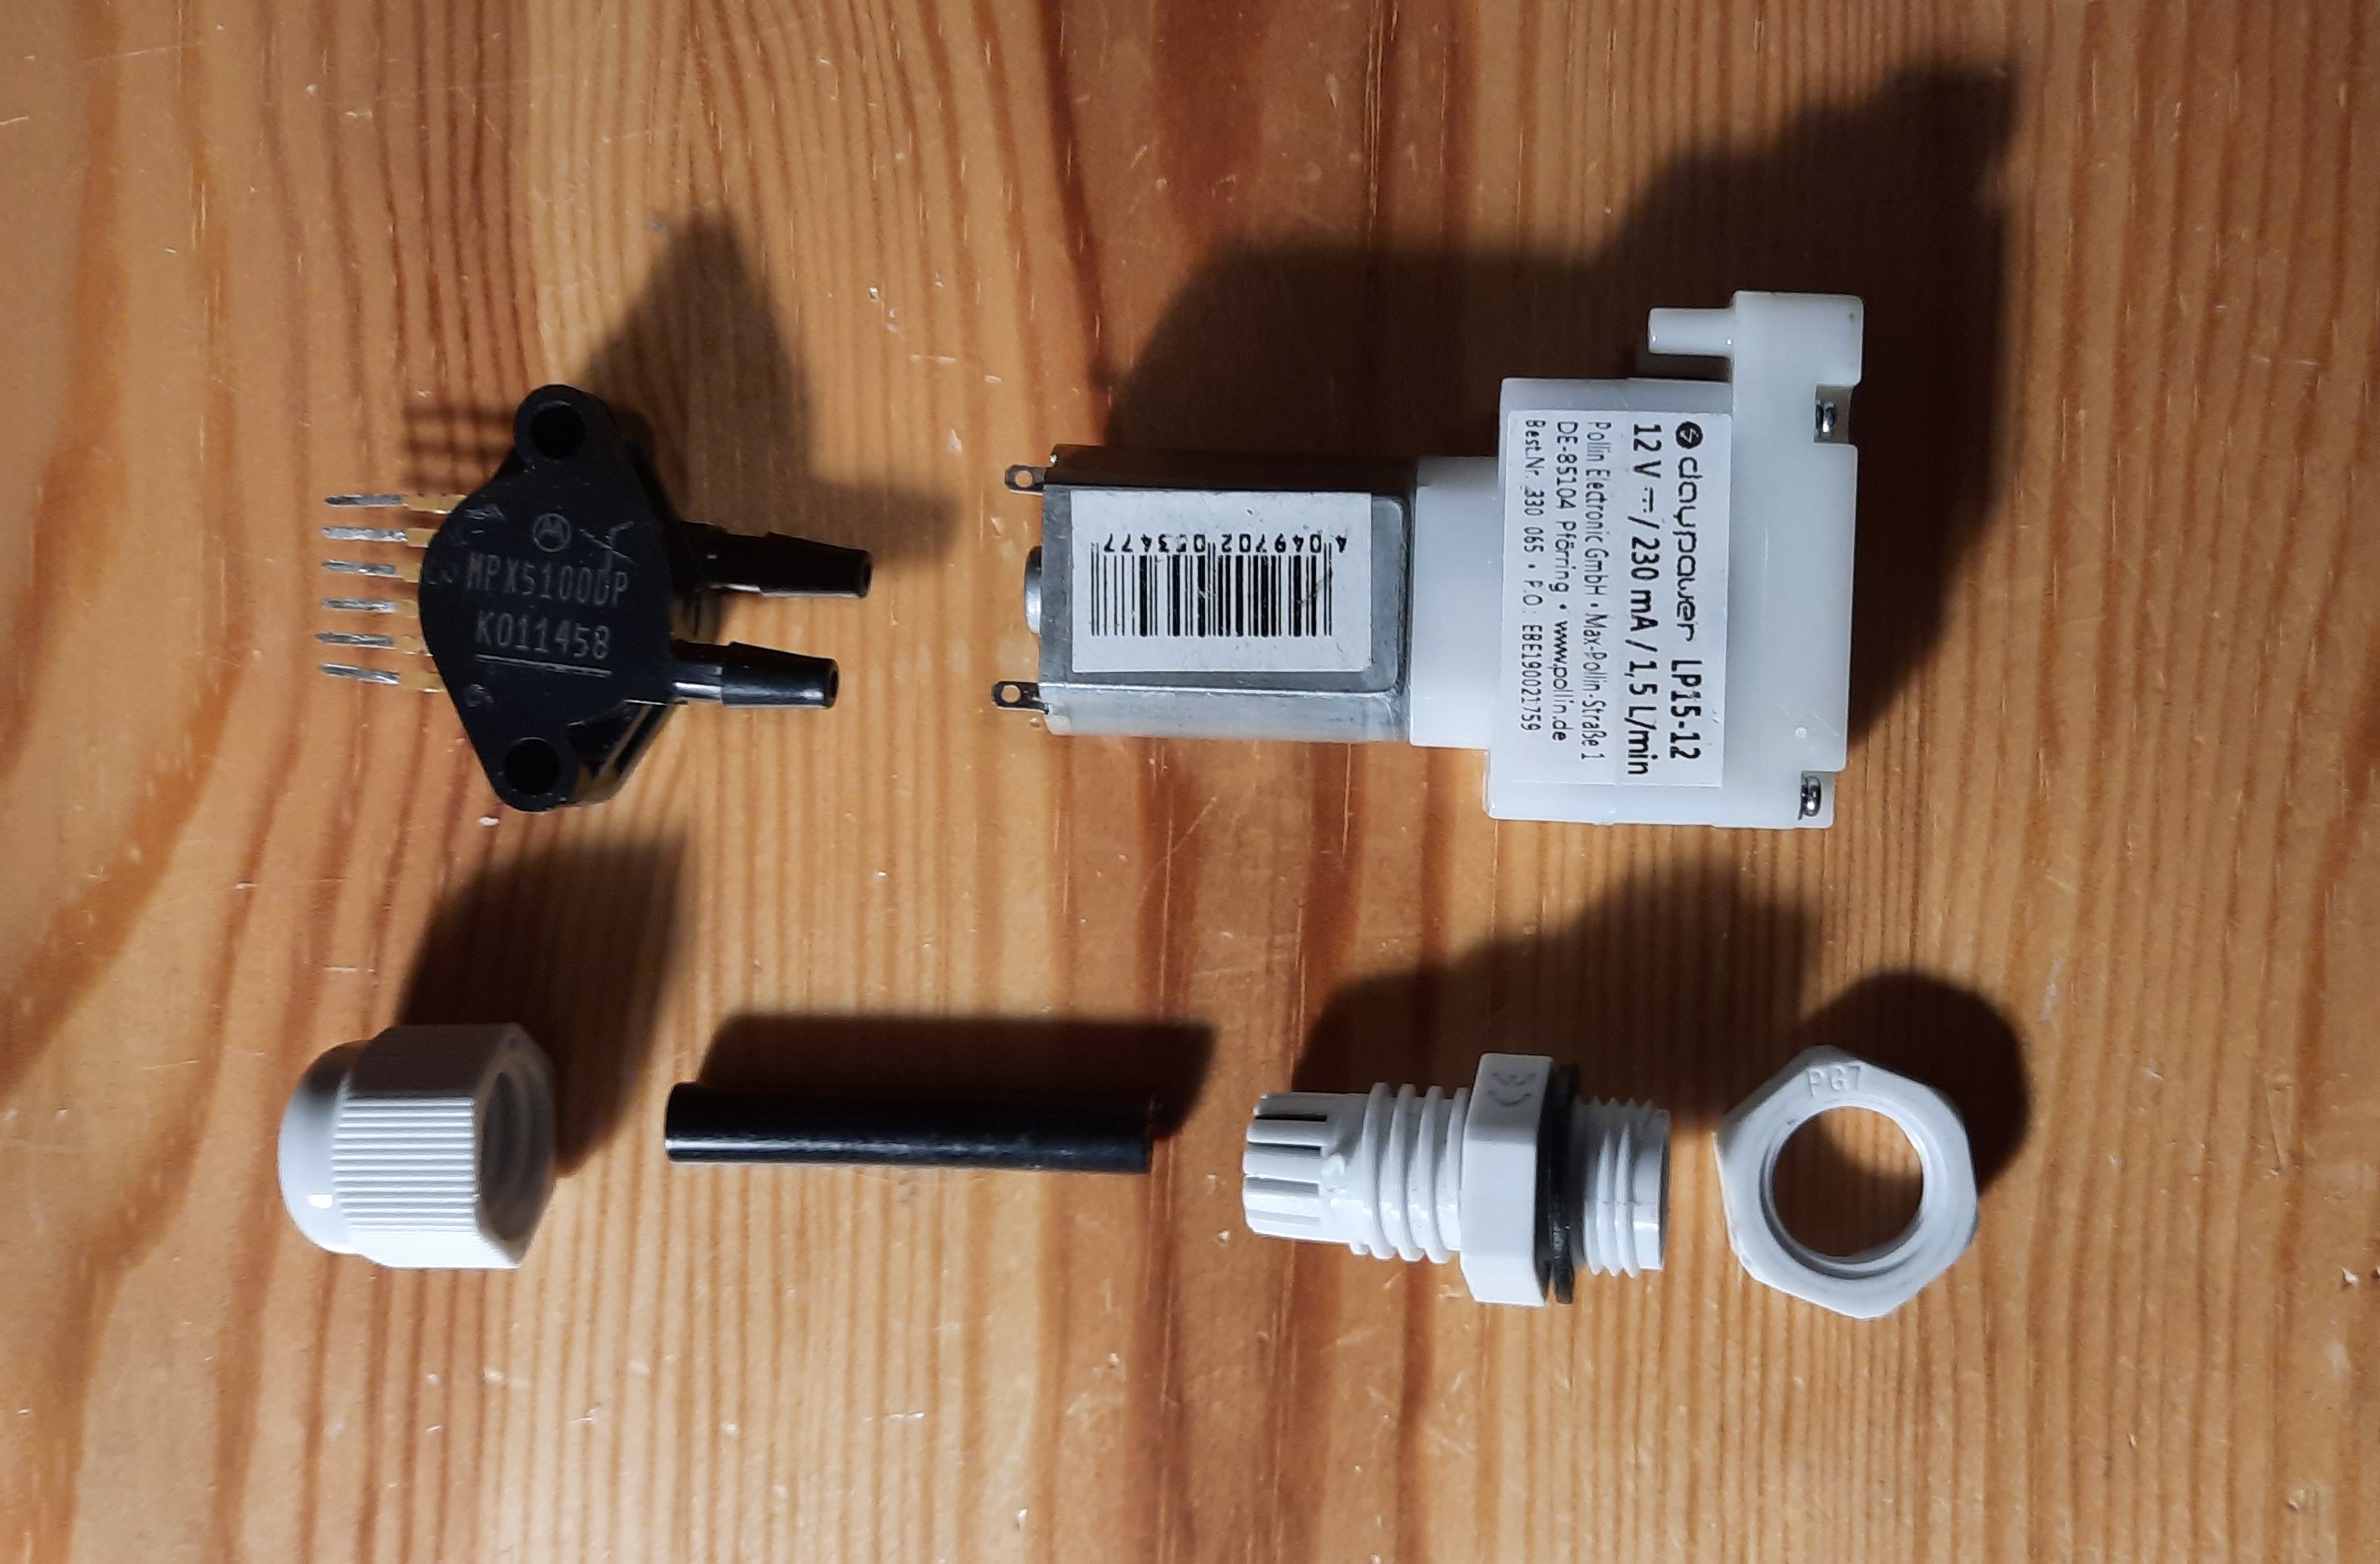
Pressure sensor, air pump, 6/4 mm pneumatic tube and Bopla grommet

Finally the masurement are available on a server with Node-Red gauges and curves or in table form. The data is stored on a Internet server in a MySQL database. All RPi programming is done with Python. Alarms can be sent to the owner with SMS.

Electic and pneumatic schema
Link to air pump supplier: Pollin Germany
Link to valve supplier: Ebay
Link to pressure sensor supplier: RS DELIVERS
WEB-BASED COURSE PLANNING
WEB-based course planning for yacht races according to courses proposed in Appendix L amendment A of World Sailing
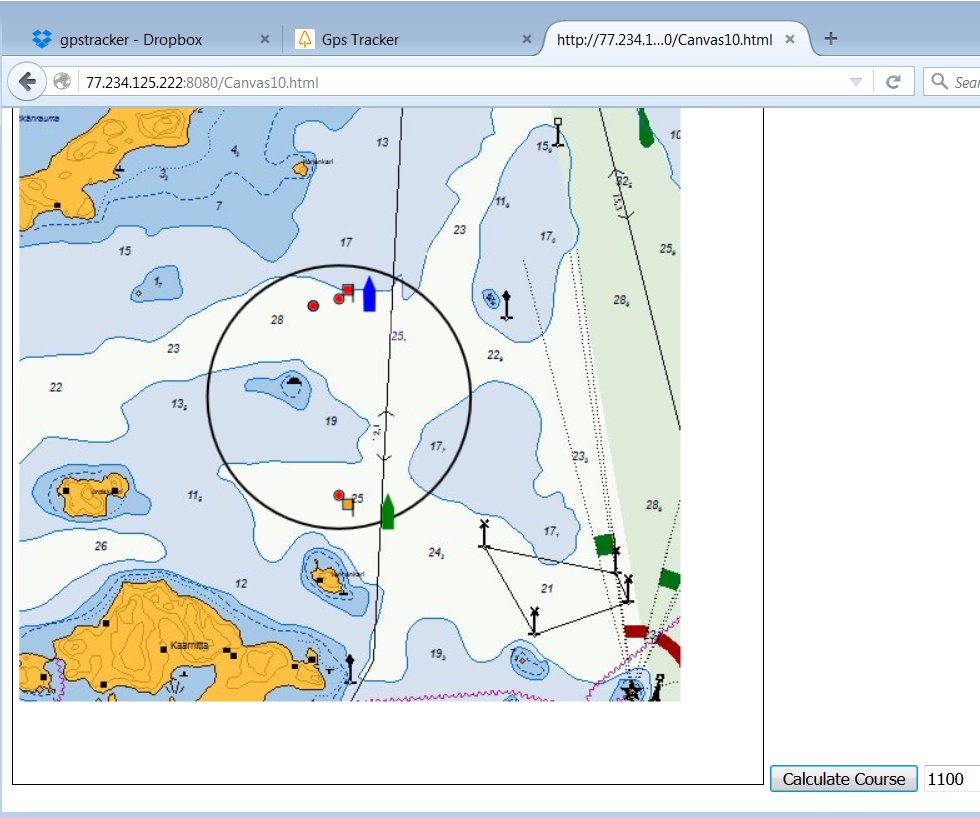
Link to Course Planning web page: /erik/Canvas15.html
Animation of Yacht Race Vessels
The competing yachts can use a free Android app to send GPS tracking data to a database, which is administrated by the racing officials during the race.
Link to a demo of animation:/erik/FourBoats20.html
